Showing posts with label Recipe Review. Show all posts

Thursday, January 24, 2013

Recipe Review: Summer Vegetable Crepes

In my hunt for tasty low calorie foods, Eating Well has been a great resource for filling and yummy food that isn't too difficult on the waist line.  This recipe caught my eye and I quickly pinned it with the hope of trying it soon.  Fresh veggies, crepes and cheese??  Sounds good to me!

I was able to get all I needed for the recipe at Publix, excluding the fresh corn.  I think out of season corn tastes blah, so instead of paying I just picked up a can of low sodium corn and rinsed it twice before using it.

When I got home I chopped up the veggies and added a little bit of extra virgin olive oil to the pan:


The veggies smelled great!  In addition to the recipe below, I also added some minced garlic and minced onion!


                     I added the cheese to the veggies and stirred it up good!  It smelled so good.  :)


I scooped out the filling and added it to the crepes.  
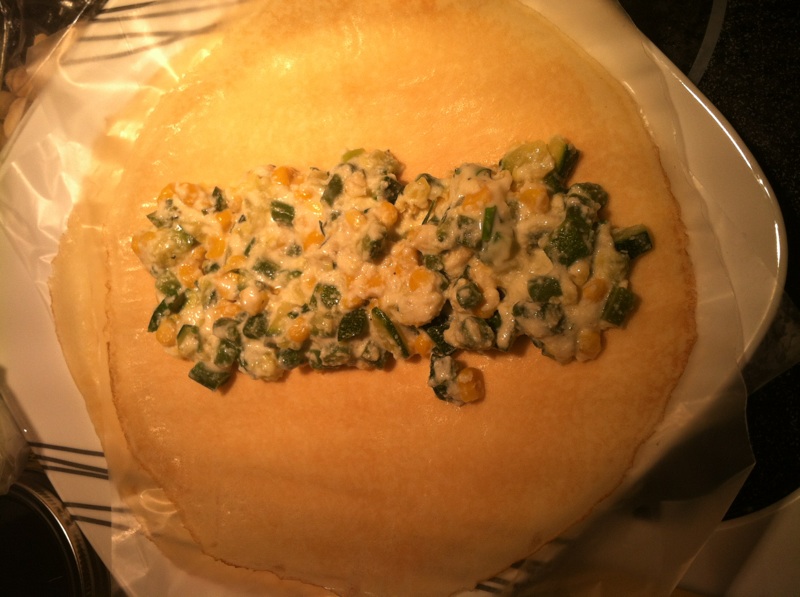

Big tip:  Use the wax paper from the crepe packaging to assist in the rolling of the crepe.  Without the whole thing falls apart!


Mmmmmmmmmm!


I added the chive/sour cream/ milk / lemon sauce to the tops and it was time to eat!
I used fat free sour cream

These were SOOOOO yummy.  I am glad I made them on a Water Zumba night, because I could not just eat one crepe.  As filling as it was, they were so good I ate half of another!!

Here is the official recipe from Eating Well:


Summer Vegetable Crêpes


Recipe is from Eating Well at  http://www.eatingwell.com/recipes/summer_vegetable_cr_pes.html


INGREDIENTS


  • 1/3 cup reduced-fat sour cream
  • 1/2 cup chopped fresh chives, divided, plus more for garnish
  • 3 tablespoons low-fat milk
  • 2 teaspoons lemon juice
  • 3/4 teaspoon salt, divided
  • 1 tablespoon extra-virgin olive oil
  • 2 cups chopped zucchini
  • 1 1/4 cups chopped green beans
  • 1 cup fresh corn kernels, (I used canned corn)
  • 1 cup part-skim ricotta cheese
  • 1/2 cup shredded Monterey Jack cheese
  • 1/4 teaspoon freshly ground pepper
  • 4 9-inch “ready-to-use” crêpes,

PREPARATION


  1. Stir sour cream, 1/4 cup chives, milk, lemon juice and 1/4 teaspoon salt in a small bowl until combined. Set aside.
  2. Heat oil in a large nonstick skillet over medium-high heat. Add zucchini, green beans and corn and cook, stirring, until beginning to brown, 6 to 8 minutes. Reduce heat to low; stir in ricotta, Monterey Jack, the remaining 1/4 cup chives, the remaining 1/2 teaspoon salt and pepper. Cook, stirring gently, until the cheese is melted, 1 to 2 minutes. Remove from the heat.
  3. To roll crêpes, place one on a piece of parchment or wax paper (or leave it on the piece of plastic separating the crêpes in the package). Spoon one-fourth of the vegetable-cheese mixture (about 3/4 cup) down the center of the crêpe. Use the paper (or plastic) to help you gently roll the crêpe around the filling. Place the crêpe seam-side down on a dinner plate. Repeat with the remaining crêpes and filling. Serve each crêpe topped with 2 tablespoons of the reserved sauce and more chives, if desired.

NUTRITION


Per serving: 302 calories; 17 g fat ( 8 g sat , 6 g mono ); 46 mg cholesterol; 25 g carbohydrates; 15 gprotein; 3 g fiber; 687 mg sodium; 485 mg potassium.
Nutrition Bonus: Calcium & Vitamin C (35% daily value), Vitamin A (20% dv).
Carbohydrate Servings: 1

Tuesday, January 15, 2013

Recipe Review: 20-Minute Hoisin Skillet Salmon


Salmon  is constantly touted for its heart healthy omega threes, low calorie, superfood... blah, blah, blah.

To me, it has been my cooking foe.

I've tried grilling it.  I've tried baking it.  I've tried pan frying it.  No matter what, it tastes like overcooked salmon crap.

However,  I have refused to give up on it.

When I found this recipe at foodnetwork.com, I decided to give salmon another go.    The ingredients intrigued me and it sounded like a simple enough recipe! To give myself more pressure, I invited Suzie over for dinner and a workout. Here is how it went:

I did need to make a special trip to Publix, not just for the Salmon fillets but also for hoisin sauce.  I wasn't sure what hoisin sauce was and figure if I didn't know what it was suppose to taste like, I wouldn't know if I was making a homemade recipe correctly.  Anyway, I digress.  The trip to Publix was mostly painless, however Salmon is not the cheapest fish.  I sighed to myself as I bought the fish hoping that this time it would be eaten and not thrown out for tasting like crap.


I added the beans and the hoisin sauce to the pan, chopped up some broccoli and added it to the top.


I nestled the salmon into the pan, and then because I love broccoli, I added some more!


I followed the recipe by letting the sauce come to a simmer and then reduced the heat and put a lid on top.  I was still in denial that a salmon recipe could be so easy.

Cooking note:  I omitted the red pepper flakes because I didn't have any and forgot to buy some!

I waited until the salmon was flakey and cooked through.  For the first time in my salmon cooking career, the salmon resembled something that looked edible!


I love cilantro so I added plenty on top of the salmon!

I was so surprised on how yummy this recipe was.  Normally Salmon is so strong in its fish taste that I force myself to eat it down.  No forcing was needed!  Dave has decided that this is one of those recipes that needs to enter our dinner rotation.


Here is the whole recipe:

20-Minute Hoisin Skillet Salmon

Courtesy of: http://www.foodnetwork.com/recipes/20-minute-hoisin-skillet-salmon-recipe/index.html

Ingredients

  • One 15.5-ounce can low-sodium black beans, drained and rinsed
  • 2 tablespoons hoisin sauce
  • 1/4 teaspoon red pepper flakes
  • 2 cloves garlic, crushed
  • 4 cups medium broccoli florets (about 8 ounces)
  • Four 5-ounce salmon fillets, skin removed
  • Juice of 1/2 lemon
  • 2 tablespoons roughly chopped fresh cilantro, optional

Directions

Combine the beans, 3/4 cup water, hoisin sauce, red pepper flakes and garlic in a large skillet. Top with the broccoli, nestle in the salmon and bring to a simmer over medium heat. Once simmering, cover the skillet and cook until the salmon is flaky and just cooked through and the broccoli is crisp-tender, 5 to 6 minutes. Drizzle with lemon juice and sprinkle with cilantro if using. Add salt to taste and serve.

Serves:4; Calories 297; Total Fat 9 grams; Saturated Fat 2 grams; Protein 36 grams; Total Carbohydrates 20 grams; Sugar 3 grams; Fiber 6.5 grams; Cholesterol 64 milligrams; Sodium 529 milligrams

Monday, January 7, 2013

Recipe Review: Sauteed Chicken Breasts with Creamy Chive sauce

I am something of a "hobby chef."  No culinary training, I just enjoy cooking!  I love looking up recipes and am addicted to Pinterest.  Since I have started counting calories, I have been making it a point to look up low calorie recipes.  I found this recipe from EatingWell and decided to try it out:

Sauteed Chicken Breast with Creamy Chive Sauce (full recipe below)

The recipe called for pretty much everything I already had on hand.  I did make a few exceptions.  What attracted me to this recipe was the calorie count.  The taste seemed kind of bland, so I did add some extras.


  1. Place chicken between sheets of plastic wrap and pound with a meat mallet or heavy skillet until flattened to an even thickness, about 1/2 inch. Season both sides of the chicken with 1/2 teaspoon salt. Place 1/4 cup flour in a shallow glass baking dish and dredge the chicken in it. Discard the excess flour.     This is where I made my first change.  Instead of using all purpose flour, I opted to use whole wheat flour.  In addition I add a half a teaspoon of smoked paprika and a teaspoon of garlic powder.
  2. Heat 2 teaspoons oil in a large nonstick skillet over medium-high heat. Add the chicken and cook until golden brown, 1 to 2 minutes per side. Transfer to a plate, cover and keep warm.


3.  Heat the remaining 1 teaspoon oil in the pan over medium-high heat. Add shallots and cook, stirring constantly and scraping up any browned bits, until golden brown, 1 to 2 minutes. Sprinkle with the remaining 1 tablespoon flour; stir to coat. Add wine, broth and the remaining 1/2 teaspoon salt; bring to a boil, stirring often.  In addition to the shallots, I added some minced garlic. Instead of using canned chicken stock, I used my own turkey stock left over from Thanksgiving dinner.  I poured WAY too much in.  It left my end sauce a little more soupy than would be desired.  Once again I substituted whole wheat flour. 


It was at this point I also realized I was way under on my calorie limit for the day and decided to pour myself a glass of wine since I had to open a bottle anyway!


4.  Return the chicken and any accumulated juices to the pan, reduce heat to a simmer, and cook until heated through and no longer pink in the center, about 6 minutes. Stir in sour cream and mustard until smooth; turn the chicken to coat with the sauce. Stir in chives and serve immediately.  I choose to use nonfat sour cream.


Like I mentioned earlier, I used WAY to much turkey stock.  I just assumed it would thicken and it didn't.  My final sauce was very soupy.  To compliment my chicken, I added a side salad of field greens and spritzed some Wishbone Italian spritzer dressing onto the salad.


The total calorie count for the meal ended up being:

Sauteed Chicken Breasts with Creamy Chive Sauce:  244 Calories
Side Salad:  5 Calories
Wishbone Salad Spriter: 20 Calories
8oz Glass of White Wine: 193 (I treated myself today)


Sauteed Chicken Breasts with Creamy Chive Sauce

4 servings
Active Time: 
Total Time: 

INGREDIENTS

  • 4 boneless, skinless chicken breasts, (about 1 pound), trimmed of fat
  • 1 teaspoon kosher salt, divided
  • 1/4 cup plus 1 tablespoon all-purpose flour, divided
  • 3 teaspoons extra-virgin olive oil, divided
  • 2 large shallots, finely chopped
  • 1/2 cup dry white wine
  • 1 14-ounce can reduced-sodium chicken broth
  • 1/3 cup reduced-fat sour cream
  • 1 tablespoon Dijon mustard
  • 1/2 cup chopped chives

PREPARATION

  1. Place chicken between sheets of plastic wrap and pound with a meat mallet or heavy skillet until flattened to an even thickness, about 1/2 inch. Season both sides of the chicken with 1/2 teaspoon salt. Place 1/4 cup flour in a shallow glass baking dish and dredge the chicken in it. Discard the excess flour.
  2. Heat 2 teaspoons oil in a large nonstick skillet over medium-high heat. Add the chicken and cook until golden brown, 1 to 2 minutes per side. Transfer to a plate, cover and keep warm.
  3. Heat the remaining 1 teaspoon oil in the pan over medium-high heat. Add shallots and cook, stirring constantly and scraping up any browned bits, until golden brown, 1 to 2 minutes. Sprinkle with the remaining 1 tablespoon flour; stir to coat. Add wine, broth and the remaining 1/2 teaspoon salt; bring to a boil, stirring often.
  4. Return the chicken and any accumulated juices to the pan, reduce heat to a simmer, and cook until heated through and no longer pink in the center, about 6 minutes. Stir in sour cream and mustard until smooth; turn the chicken to coat with the sauce. Stir in chives and serve immediately.

NUTRITION


Per serving: 244 calories; 9 g fat ( 3 g sat , 3 g mono ); 72 mg cholesterol; 1 g carbohydrates; 26 g protein;0 g fiber; 679 mg sodium; 334 mg potassium.

Nutrition Bonus: Niacin (50% daily value), Selenium (31% dv).

Carbohydrate Servings: 1/2
Exchanges: 1/2 starch, 4 very lean meat ,1 fat

Saturday, February 18, 2012

Chicken Taco Nachos

I've had bad luck with colds this year. New job in a new state, my immune system isn't as strong as it normally is. Because of this, I have been enjoying many recipes involving whole chicken and homemade chicken stock. I do plan on blogging about my chicken soup and why I now love cooking whole chickens, but today I am going to skip ahead and share a good leftover chicken recipe that both Dave and I really enjoy.

Chicken Taco Nachos:

Leftover chicken shredded into bite size pieces
Taco seasonings (I prefer the low sodium kind due to blood pressure issues)
2 Fresh Jalapenos (or more or less depending on your person hotness taste)
Slice Olives
Blue Chips
Mexican Cheese (I prefer fat free cheddar)


Preheat oven to 375

In a frying pan, heat up the chicken with the taco spices.


Grab a baking sheet and cover it with blue chips (or other type of tortilla chips). Slice the jalapenos and spread them around over the chips.


Spread out the heated chicken over the chips. Top with olives and cheese.


Pop the baking tray in the oven for 10 minutes or until the cheese is melted.


Let cool for a few minutes so you don't burn your taste buds and enjoy. :)


This is quick and easy for those night you want a quick meal and need to get rid of that extra chicken!

Monday, January 23, 2012

Bye, Bye, Gallbladder!

What a way to start the new year! After some stomach pain and sickness, they yanked my gallbladder out last Thursday. For a person who is pretty doped up and not hungry, I have been looking up a lot of yummy recipes that my body can't handle eating right now. However, I've had a surplus of facebook friends posting about making granola so I decided to add my recipe to the mix. I have to thank my friend Cheryl for sharing this recipe with me!


yummy granola:

4 cups oatmeal
2 cups coconut
2 cups nuts
3/4 cup veg. oil
1/2 cup honey
brown sugar

Mix ingredients and spread in a sheet pan. Sprinkle brown sugar on top. Bake at 350 for about 15 minutes.

Add dried fruit after you bake it (cranberries, raisins, etc.).

This granola is soooo tasty. I also add chocolate chips to it as well (I wouldn't be a chocoholic without it!). This tastes great with yogurt or with warm milk. :) Another great idea is to throw some of this granola into a food processor with some dates and make into an awesome bar.

I want some now. I hope my lack of gallbladder lets me eat it! ;)

Monday, October 17, 2011

I ate fish and I didn't die

My whole world has been turned upside down.

A little bit of a back story. About 9 years ago I ate a plate of mahi-mahi and broke out in hives. Ever since then, I have avoided fish like the plague. However, recently I went into Publix and saw a sample tray of what I thought was chicken. It was really yummy so I grabbed a few more pieces before I realized it was talapia. Panic set in and I waited for the hives to come. To my surprise they didn't. I am now able to introduce a healthy new meal into my routine and Dave will be thrilled since he loves to eat fish.

So even though I have NEVER made fish before, I tried my hand at cooking pecan-crusted tilapia.

I do not have pictures to post, but the next time I cook it I'll be sure to add it into a new post. :)

Here is the recipe from Publix, my changes will be in italics. :)

Pecan-Crusted Tilapia
  • 1/2 cup pecan pieces, finely chopped (I ran out and hold to go without on the last piece)
  • 1/2 cup bread crumbs
  • 1/4 cup flour (I used whole-wheat flour)
  • 1/2 cup skim milk
  • 1/4 cup egg substitute or one egg
  • 1 1/2 lb tilapia fillets
  • 1 teaspoon seasoned salt
  • 1/4 cup canola oil ( I used extra-virgin olive oil and was no where close to 1/4 cup)
Prep
  • Chop pecans and combine with bread crumbs in a shallow bowl
  • Place flour in second bowl
  • Whisk milk and egg together in a third bowl
Steps
1. Sprinkle both sides of fish with seasoned salt. Dip fish in flour (coating both sides) then dip into egg mixture (allowing excess to drip off). Finally, dip into pecan mixture.
2. Preheat large saute pan on medium 1-2 minutes
3. Place oil in pan, then add fish; cook 2-3 minutes on each side or until golden 145 degrees. Serve


The was fish was so moist and didn't have that icky "fishy" smell. I am really psyched. Fish is a so nutritious and I've been avoiding it for years. Stay tuned for more recipes as soon as I try them!

Wednesday, September 21, 2011

Mac and Cheese

So one day at work I was procrastinating and checking my email, when a recipe for a healthy alternative to Mac and Cheese popped up. Intrigued, I clicked on the link and sure enough, yumness popped up.

I loooooooooove mac and cheese. The incredibly unhealthy Kraft kind. Mmmmm... yellow cheese powder. Of course Overweight Chocoholics attempting not to look like Miss Piggy in a wedding dress has banned the Cheesiest from her wedding dress diet. Seeing the blue box sitting on those grocery shop shelves brings a single tear to my eye.


The recipe I found with its whole grain pasta and spinach has a lot more umpf than the kiddy Kraft kind, but the goodness is too much to pass up. Looking at the recipe, I decided to make some changes and turn it from a side dish into a yummy baked casserole able to be eaten over multiple days.

The original recipe is so:

Ingredients

  • 3 tablespoons plain dry breadcrumbs, (see Tip)
  • 1 teaspoon extra-virgin olive oil
  • 1/4 teaspoon paprika
  • 1 16-ounce or 10-ounce package frozen spinach, thawed
  • 1 3/4 cups low-fat milk, divided
  • 3 tablespoons all-purpose flour
  • 2 cups shredded extra-sharp Cheddar cheese
  • 1 cup low-fat cottage cheese
  • 1/8 teaspoon ground nutmeg
  • 1/4 teaspoon salt
  • Freshly ground pepper, to taste
  • 8 ounces (2 cups) whole-wheat elbow macaroni, or penne

Preparation
  1. Put a large pot of water on to boil. Preheat oven to 450°F. Coat an 8-inch-square (2-quart) baking dish with cooking spray.
  2. Mix breadcrumbs, oil and paprika in a small bowl. Place spinach in a fine-mesh strainer and press out excess moisture.
  3. Heat 1 1/2 cups milk in a large heavy saucepan over medium-high heat until steaming. Whisk remaining 1/4 cup milk and flour in a small bowl until smooth; add to the hot milk and cook, whisking constantly, until the sauce simmers and thickens, 2 to 3 minutes. Remove from heat and stir in Cheddar until melted. Stir in cottage cheese, nutmeg, salt and pepper.
  4. Cook pasta for 4 minutes, or until not quite tender. (It will continue to cook during baking.) Drain and add to the cheese sauce; mix well. Spread half the pasta mixture in the prepared baking dish. Spoon the spinach on top. Top with the remaining pasta; sprinkle with the breadcrumb mixture.
  5. Bake the casserole until bubbly and golden, 25 to 30 minutes.

As yum as this recipe seemed, I decided to make some changes to slim it down and make it a whole meal instead of a side dish.

For the pasta, I chose to use whole-grain penne pasta and cooked enough to fill a shallow casserole dish. Since the dish was shallow, instead of layering the spinach, I chose to mix it in with the pasta and cheese sauce.

Instead of using plain breadcrumbs, I choose to use panko style breadcrumbs for its superlicious crunchy taste. Since I used a larger casserole dish, I need more than three table spoons. The oil was still more than enough and lightly coated all of the breadcrumbs. I also used 1% milk (it was what we had), whole wheat flour, fat-free cottage cheese, and mixed a cup of fat free cheddar with the extra sharp cheddar.
When mixing the cheese, in addition to the nutmeg, I also added a teaspoon of garlic powder and a teaspoon of paprika to give the cheese a little extra flavor. I also substituted a pinch of seasalt instead of regular salt.


Once the pasta was mixed with the cheese sauce, and spinach, I added the breadcrumb layer and popped it in the oven to cook and bubble for a yummy dinner for Dave and me.

Oh my god. This thing was unbelievable. We actually ate this dish for 3 days without any complaints, and were sad when it was gone. Perfect comfort food without the powder cheese! This meal will be added into the rotation.

According to the original recipe, a serving of this casserole was around 500 calories. Give and take my fatfree changes, it is a hearty meal. The best part is I didn't have to eat a lot to feel full and energized for the whole day. This was definitely my kind of meal!

Thursday, August 26, 2010

Homemade Larabars!!!!!!!!!


Thanks to my good pal Sarah over at geonerdette, I've been introduced to the wonderful world of Larabars. Prior to making these, I don't think I've ever had dates before. I found a decent size package of organic dates at Trader Joe's and figured I would give these Larabars a whirl!

I chose to experiment with the Cookie Dough recipe that Sarah had posted on her blog. I made a few changes as I went along. One thing I should mention... since I never had dates before, I didn't realize they had pits. So... to save yourself from a possible busted tooth... remember to de-pit the dates. This service message was brought to you by the American Dental Association and the letter 'M'.

Here is the recipe as posted on Sarah's blog:

Chocolate chip cookie dough:

  • 1/3 cup dates (very coarsely chopped)
  • 1/2 cup walnuts (I used pecans because Dave isn't a fan of walnuts)
  • 1/2 ounce dark chocolate (coarsely chopped) (I used semi-sweet chocolate mini chips)
  • Dash cinnamon
  • 1/2 tsp vanilla

This recipe works best with a good food processor. :)


I found that it was easier to first chop up the nuts, then add the dates. It didn't stick to the side as much when I did it that way. After that I threw in the rest of the ingredients and chopped up some more.


The recipe create two Larabars at 110 calories a piece. Once finished I wrapped them up in parchment paper and stuck them in the fridge for later.

MMMMMMMMMMMMMMMMM... they were so good. Dave liked them so much, he managed to eat half of them before I even noticed they were disappearing. ;)

Tuesday, August 17, 2010

Super Healthy No Bakes


So after making no bakes that contained a lot of sugar, I went on a search to see if I could find an alternative recipe. Low and behold, one existed. Interesting enough, the recipe I found was a vegan recipe and involved stopping at stores and shopping in areas of the supermarket I don't normally frequent.

So for those interested here is the recipe:

No Bake Super Healthy Recipe

Ingredients:

  • ½ cup non dairy milk (soy, almond, coconut, rice) I used coconut milk because it was the cheapest
  • ½ cup coconut oil
  • ¾ cup brown rice syrup Tricky to find... I ended up at Whole Foods and it was a bit pricey
  • ¼ cup unsweetened cocoa powder Trader Joe's
  • 2 teaspoons almond extract (optional) I chose to use it
  • 4 1/2 cups whole oats
  • ¾ cup natural peanut butter (if you use an unsalted peanut butter, you may want to add ½ teaspoon of salt to this) Jif was on sale this week :)
    In a medium sauce pot add the milk, coconut oil, brown rice syrup and cocoa powder
Bring to a boil over medium heat stirring frequently

Once it has reached a boil remove from heat and add peanut butter and almond extract (if using) and stir to dissolve

Add whole oats and stir well

Let the stirred mixture sit for about 10 minutes to cool

Use a tablespoon to scoop cookies onto a sheet of foil or wax paper.
Allow to sit up for 20-30 minutes

(This is were I forgot I was taking pictures. :-D )


Roll/squeeze into balls and store in the refrigerator (note: this is not necessary but I think it helps to setup the cookies and if using whole oats it helps to soften them over time)


Granted these were NOT as good as the sugary ones (surprise, surprise) but for a vegan recipe, it wasn't bad. It is important to let these cookies firm up in the fridge. I'm not sure what it was, but when we tried the cookies the night I made them, and they had a nasty bitter aftertaste.

Refusing to give up on the cookies, I tried them again a couple days later and were surprised at how sweet they were. The almond extract definitely gives the cookies a marzipan quality.

Nice and sweet and NO white sugar was used. Awesome :)